We all know how much fun Tie Dye shirts can be, but have you seen the latest trend going around using bleach instead of colorful dyes?! decided to make a shirt that used reverse tie-dye to enhance a vinyl design. Follow along for an easy Tutorial on this cute new trend, and don’t forget to download your Free SVG from my shop or in the resource library! Happy Crafting!
Supplies You Need
- Bleach
- T Shirt of your choice (Different colors will have different effects)
- Bowl (to put bleach in)
- Rubber Bands
- HTV Vinyl
- Cutting machine (Cricut)
- Mom Life SVG (free in my shop or in the resource library)
Steps To Take
Step 1- Grab your shirt of choice, and lay out on a flat surface with the back of the shirt facing upwards.

Step 2- Grab the middle of your shirt, and start twisting it clockwise so that you will end up with the shirt all bunched together nicely.

Step 3- Take your rubber bands and secure them around your shirt. There is no right or wrong way to place your band on the shirt.
*TIP- your design is going to change based on what is exposed in the swirl. Play with adjustments to the swirl to change the final design.

Step 4- Take your bleach, and pour it into a small bowl. You don’t need a lot of bleach, just enough to saturate the bottom of your shirt.

Step 5- Take your shirt and dip it into the bleach so it saturates the twirl that your shirt made. I dipped my shirt maybe an inch, if that into the bleach. Take it out after a few seconds.
Step 6- Now that your shirt has been dipped, go out into the sunlight and lay down the shirt in the sunshine for a few minutes. You will be able to see the colors changing so it’s your personal choice how long you want it to set on it, but i used a green shirt so I wanted mine to turn almost white before rinsing it out. **Be Careful if you are using 100% cotton T shirts as the bleach can eat the shirt if it’s on the shirt too long**
Step 7- Once your shirt is at the color you like, it is time to throw it into the bath tub or shower, and rinse with cold water so the bleach stops processing further.
Step 8- After you rinse your shirt in cold water, throw it into a cold cycle inside your washer WITHOUT any detergent or softener. Once washed, hang to dry.
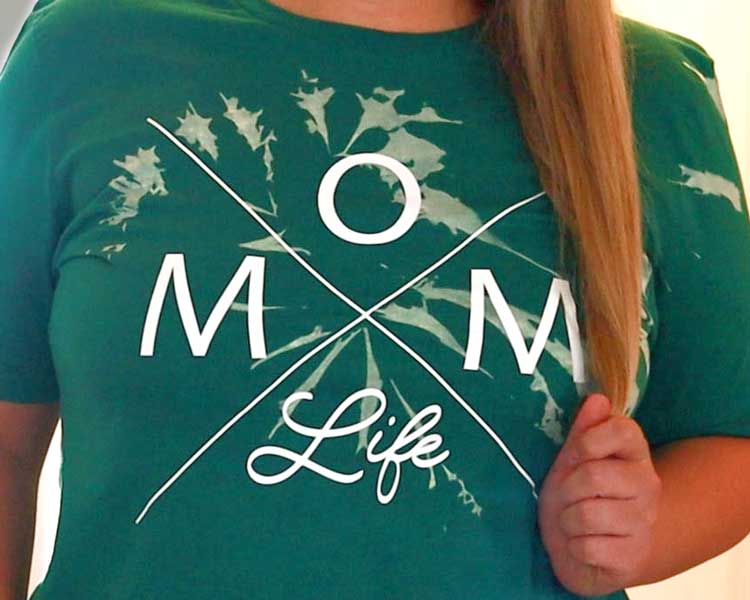
Step 9- Your shirt is completely dry, and now it’s time to put on your Mom Life vinyl design.
Step 10- Upload your free SVG from my site into your Cricut Design Space or whichever program you are working with. Size the SVG to fit your shirt, cut your vinyl out, and weed the design.

Step 11- Iron on or use a heat press, to apply the design.

Step 12- Your shirt is now finished and ready to wear! Make sure to tag us in your pictures if you try our Tutorial!
